かぴばらさんの覚書ブログ (nonkapibara 自分メモ)

かぴばらさんの覚書ブログ (nonkapibara 自分メモ)

Unity勉強中です。 AR、VR、エンターテイメント全般、ワクワクする事が大好き♪♪ O(≧∇≦)O イエイ!!

【Unity】キャンディー(アイテム)とキャラクター衝突時に発生するOnTriggerEnterイベント


キャンディー(アイテム)とキャラクター衝突時に発生するOnTriggerEnterイベント
💖Is Trigger チェックON
💖Use Gravity チェックOFF
💖Is Kinematic チェックON


実際に動かした動画はこちら↓↓

https://twitter.com/nonnonkapibara/status/1088063650357641217


環境メモ

⭐️Mac OS Mojave バージョン10.14

⭐️Unity 2018.2.15f1


1.キャンディに、タグをつける(Candy

キャンディー(アイテム)にColliderの「Is Trigger」チェックONし、

Use Gravity チェックOFFし、Is Kinematic チェックONする。

f:id:nonkapibara:20190123230017p:plain

2.キャラクターにスクリプトを設定する

f:id:nonkapibara:20190123230036p:plain

3.Main Cameraの設定

f:id:nonkapibara:20190123230111p:plain


    /*
     * キャンディーとキャラクター衝突時に発生するイベント
     * Is Trigger チェックON
     * Use Gravity チェックOFF
     * Is Kinematic チェックON
     */
    private void OnTriggerEnter(Collider other)
    {
        // Candyタグの場合
        if (other.gameObject.tag == "Candy")
        {
            Debug.Log("OnTriggerEnter");
            // キャンディーを削除する(第二引数は、オブジェクトを破壊するまでのディレイ時間)
            Destroy(other.gameObject, 0.1f);
        }
    }


【Unity】jpgファイルからマテリアルを作成しSkybox Materialを設定するやり方

完成したSkyboxはこちら↓↓

https://twitter.com/nonnonkapibara/status/1088063650357641217


環境メモ

⭐️Mac OS Mojave バージョン10.14

⭐️Unity 2018.2.15f1

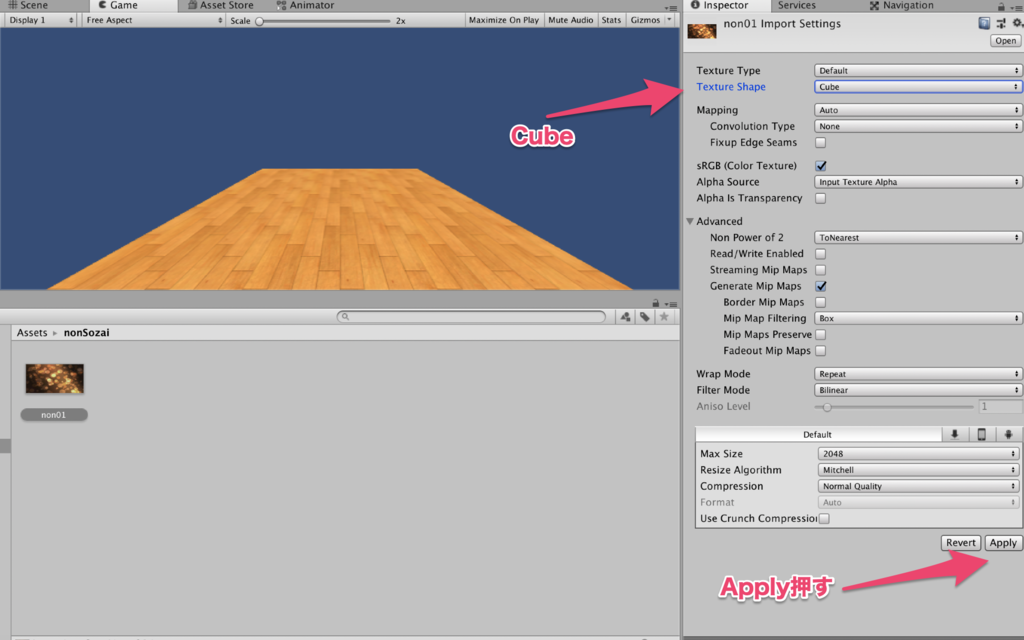
1.素材のjpgをセットし、Texture Shapeを2D -> Cubeにする

f:id:nonkapibara:20190123223313p:plain

2.Applyを押すと、素材のJpgCubeになる

f:id:nonkapibara:20190123223332p:plain


f:id:nonkapibara:20190123223351p:plain


3.Materialを作る

f:id:nonkapibara:20190123223410p:plain


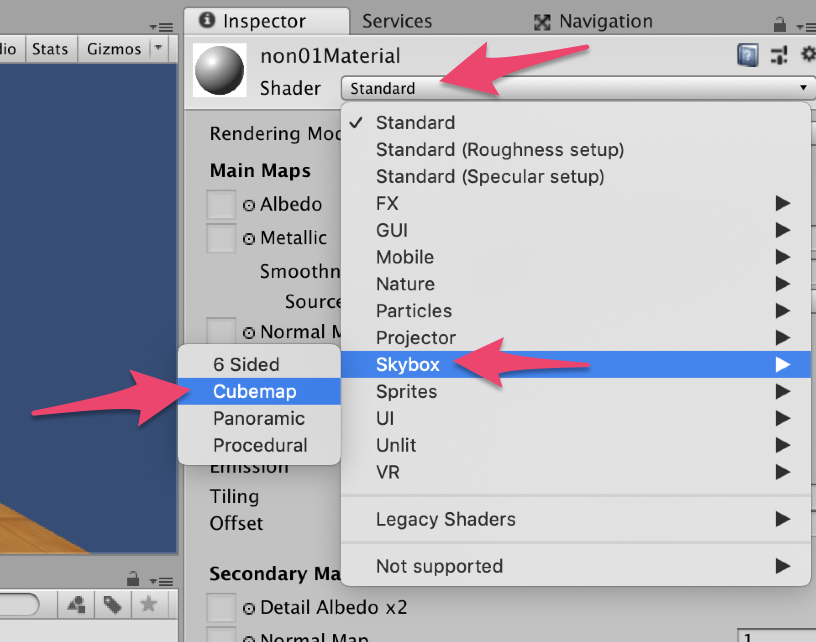
4.作成したMaterialを選択しShaderSkybox」ー「cubemap」を選択する

f:id:nonkapibara:20190123223432p:plain


5.Cubemap」からSELECTを押し、配置するMaterialを選択する

f:id:nonkapibara:20190123223451p:plain

6.マテリアルができる。

f:id:nonkapibara:20190123223648p:plain

7.Window 」ー 「Rendering ー 「Lighting Settings」を選択する

f:id:nonkapibara:20190123223714p:plain

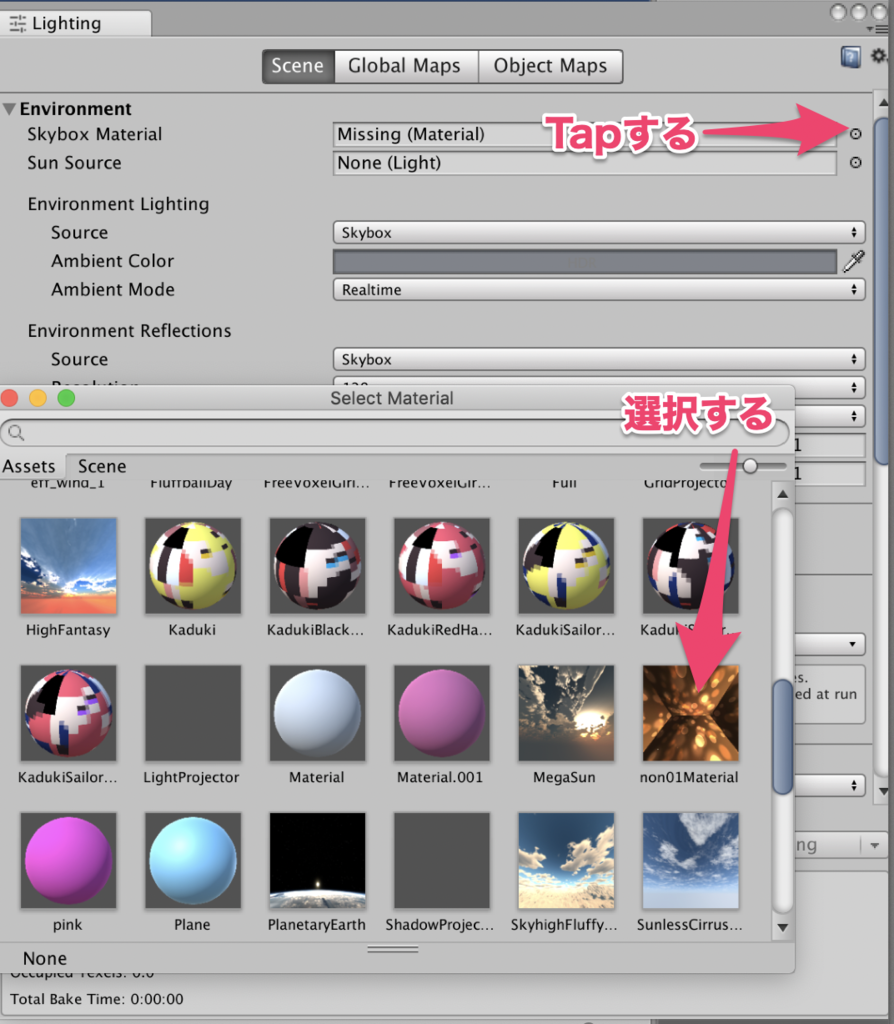
8.Skybox Materialを押し、マテリアルを選択する

f:id:nonkapibara:20190123223735p:plain

完成!!

f:id:nonkapibara:20190123224156p:plain


【Unity】キャンディーが飛んで行ったーーーー!!Rigidbody「Is Kinematic」 チェックOFF

環境メモ

⭐️Mac OS Mojave バージョン10.14

⭐️Unity 2018.2.15f1


実際に動かした動画はこちら↓↓

https://twitter.com/nonnonkapibara/status/1087731400059600896


1.キャラクターに、Character Controllerを設定する。

f:id:nonkapibara:20190123003659p:plain


※Character Controllerは、「ComponentーPhysics」ー「Character Controller」

f:id:nonkapibara:20190123003733p:plain


2.ピンクのキャンディにBoxCollider&Rigidbodyを設定し

RigidbodyIs Kinematic チェックOFF

(物理演算の影響を受けないOFF

f:id:nonkapibara:20190123003902p:plain


※Assetsは、以下の素材を使用しました。

Skybox Series Free

f:id:nonkapibara:20190123004347p:plain


【Unity】UnityARImageAnchor 画像トラッキング [ARKit1.5]

2枚の手書き絵の画像をトラッキングしてUnity Chanを表示する。

環境メモ

⭐️Mac OS Mojave バージョン10.14

⭐️Unity 2018.2.15f1

⭐️Xcode10.1

⭐️iPhone7(IOS 12.1)

実際に動かした動画はこちら↓↓

https://twitter.com/nonnonkapibara/status/1068659956012859396


■めも1→キャラクターが後ろを向いて表示されるのでUpdateImageAnchorでカメラの方向に向かせるように修正しました。

■めも2→キャラクターがチラチラ消えるので、RemoveImageAnchorGameObjectDestroyをコメントにしてみました。

Unity

Unity3D

ARKit

画像トラッキング

UnityARImageAnchor


1.UnityARKitPlugin/Examples/ARKit1.5/UnityARImageAnchor/UnityARImageAnchor.unityを展開する

f:id:nonkapibara:20181201092931p:plain

2.RandomCubeを非表示にする

f:id:nonkapibara:20181201093017p:plain

3.AssetsストアよりOptimize, SD Kohaku-Chanz!をインポートする

f:id:nonkapibara:20181201093047p:plain


5.UnityARKitPlugin/Examples/ARKit1.5/UnityARImageAnchor/ReferenceImagesフォルダの中に画像を入れる

nondog.jpg(470×676)

fish.jpg(686×602

f:id:nonkapibara:20181201093115p:plain


後から判明したのですが、絵は正方形(512×512)で作る必要があったみたいです。

nondog.jpg(512×512)

fish.jpg(512×512


6.プロジェクト「Create」「UnityARKitPlugin」「ARReferenceImage」を選択する

7.2つ作り、以下の名前にした。

nondogReference.asset

fishReference.asset

f:id:nonkapibara:20181201093244p:plain

8.nondogReference.asset」を選択し、名前を「dog」にしARマーカーサイズPhysical Sizeを「0.5」にする。

f:id:nonkapibara:20181201093320p:plain

9.fishReference.asset」を選択し、名前を「fish」にしARマーカーサイズPhysical Sizeを「0.5」にする。

Physical Sizeは「1」で100cm。「0.5」なので50cm

実際書いたnondogfishの絵が、ちょっと小さかったかなぁ。

とりあえず、50cm以内には収まる。

f:id:nonkapibara:20181201093349p:plain

10.もともとサンプルで「ARImagesSet_UnityLogo」があるので、そこにdogfishを追加することにした。

f:id:nonkapibara:20181201093427p:plain

11.もとのサンプルが2つあるので、そこに、2つ追加するので、「Reference images」のSizeを「4」に変更する

Element2Element3に、nondogReference.assetfishReference.assetを追加する

f:id:nonkapibara:20181201093452p:plain

12.ヒエラルキーウィンドウ「ARCameraManager」を選択し「Maximum Number Of」を4に変更する

f:id:nonkapibara:20181201093518p:plain

13.Create Empty」を作る

f:id:nonkapibara:20181201093537p:plain


14.Generate Image Anchor」追加する

CameraParent」「MainCamera」の下に

FishObjectDogObjectを作る。

f:id:nonkapibara:20181201093559p:plain

f:id:nonkapibara:20181201093612p:plain

15.Game Objectを「DogObject」に名前を変更し、Main Cameraの配下に配置する

Reference Imageに「nondogReference.asset」を設定する

Prefab To Generateに「UTC_SchoolUniform_summer」プレハブを設定する

f:id:nonkapibara:20181201093640p:plain

16.Reference Imageに「fishReference.asset」を設定する

Prefab To Generateに「Misaki_SchoolUniform_Winter」プレハブを設定する

f:id:nonkapibara:20181201093704p:plain

プレハブの「UTC_SchoolUniform_summer」のサイズを1.5サイズにする

f:id:nonkapibara:20181201093921p:plain

プレハブの「Misaki_SchoolUniform_Winter」のサイズを1サイズにする

f:id:nonkapibara:20181201094137p:plain


18.Generate Image Anchor.csスクリプトを開く

f:id:nonkapibara:20181201093726p:plain

19.void UpdateImageAnchor
メソッドに「キャラクターをカメラの方向に向ける」と「キャラクターをカメラの方向に回転させる」ようにソースコードを追加する

キャラクターが少しチラチラするので、「RemoveImageAnchor」メソッドの

GameObject.Destroy (imageAnchorGO);」をコメントにする

f:id:nonkapibara:20181201093747p:plain

めも1→キャラクターが後ろを向いて表示されるのでUpdateImageAnchorでカメラの方向に向かせるように修正しました。

めも2→キャラクターがチラチラ消えるので、RemoveImageAnchorGameObjectDestroyをコメントにしてみました。


20.Xcodeの「Deployment Target」を」12.1にする

動作した環境は、以下の通り

⭐️Xcode10.1

⭐️iPhone7(IOS 12.1)

f:id:nonkapibara:20181201093811p:plain


GenerateImageAnchor.cs
using System.Collections;
using System.Collections.Generic;
using UnityEngine;
using UnityEngine.XR.iOS;

public class GenerateImageAnchor : MonoBehaviour
{


    [SerializeField]
    private ARReferenceImage referenceImage = null;

    [SerializeField]
    private GameObject prefabToGenerate = null;

    private GameObject imageAnchorGO;

    // Use this for initialization
    void Start () {
        UnityARSessionNativeInterface.ARImageAnchorAddedEvent += AddImageAnchor;
        UnityARSessionNativeInterface.ARImageAnchorUpdatedEvent += UpdateImageAnchor;
        UnityARSessionNativeInterface.ARImageAnchorRemovedEvent += RemoveImageAnchor;

    }

    void AddImageAnchor(ARImageAnchor arImageAnchor)
    {
        Debug.LogFormat("image anchor added[{0}] : tracked => {1}", arImageAnchor.identifier, arImageAnchor.isTracked);
        if (arImageAnchor.referenceImageName == referenceImage.imageName) {
            Vector3 position = UnityARMatrixOps.GetPosition (arImageAnchor.transform);
            Quaternion rotation = UnityARMatrixOps.GetRotation (arImageAnchor.transform);

            imageAnchorGO = Instantiate<GameObject> (prefabToGenerate, position, rotation);
        }
    }

    void UpdateImageAnchor(ARImageAnchor arImageAnchor)
    {
        Debug.LogFormat("image anchor updated[{0}] : tracked => {1}", arImageAnchor.identifier, arImageAnchor.isTracked);
        if (arImageAnchor.referenceImageName == referenceImage.imageName) {
            if (arImageAnchor.isTracked)
            {
                if (!imageAnchorGO.activeSelf)
                {
                    imageAnchorGO.SetActive(true);
                }

            }
            else if (imageAnchorGO.activeSelf)
            {
                imageAnchorGO.SetActive(false);
            }
            imageAnchorGO.transform.position = UnityARMatrixOps.GetPosition(arImageAnchor.transform);
            imageAnchorGO.transform.rotation = UnityARMatrixOps.GetRotation(arImageAnchor.transform);
            // キャラクターをカメラの方向に向ける
            imageAnchorGO.transform.LookAt(Camera.main.transform.position);
            // キャラクターをカメラの方向に回転させる
            imageAnchorGO.transform.eulerAngles = new Vector3(0, imageAnchorGO.transform.eulerAngles.y, 0);
        }

    }

    void RemoveImageAnchor(ARImageAnchor arImageAnchor)
    {
        Debug.LogFormat("image anchor removed[{0}] : tracked => {1}", arImageAnchor.identifier, arImageAnchor.isTracked);
        // キャラクターがチラチラ消えるのでコメントにしました。
        /*
        if (imageAnchorGO) {
            GameObject.Destroy (imageAnchorGO);
        }
        */ 

    }

    void OnDestroy()
    {
        UnityARSessionNativeInterface.ARImageAnchorAddedEvent -= AddImageAnchor;
        UnityARSessionNativeInterface.ARImageAnchorUpdatedEvent -= UpdateImageAnchor;
        UnityARSessionNativeInterface.ARImageAnchorRemovedEvent -= RemoveImageAnchor;

    }

    // Update is called once per frame
    void Update () {
        
    }
}


自分メモ・・・最初、fish画像のサイズが310pxの場合、以下のエラーが出ました。

ARUnityChanTraking[1548:71129] [Session] Session (0x105f53280): did fail with error: Error Domain=com.apple.arkit.error Code=300 "Invalid reference image." UserInfo={NSLocalizedFailureReason=One or more reference images have an invalid size: Fish, NSLocalizedRecoverySuggestion=Make sure that all reference images are greater than 100 pixels and have a positive physical size in meters.,

幅と高さは、少なくとも480ピクセルにしないといけないらしい。


f:id:nonkapibara:20181202003305p:plain

完成


【Unity】Version3 敵をランダムに出現させショットガンで打つ(パーティクルあり)

カメラワークもショットガンに追跡させた。

環境メモ
⭐️Mac OS Mojave バージョン10.14
⭐️Unity 2018.2.15f1


実際に動かした動画はこちら↓↓

https://twitter.com/nonnonkapibara/status/1066693012036640769


1.PopEnemyScript」で敵を生成するスクリプトを書く。

ヒエラルキーウィンドウに配置している「ZomBear」3体を削除する

f:id:nonkapibara:20181125230311p:plain

2.ヒエラルキーウィンドウに、「Empty Object」を作成し「PopEnemyObject」に名前を変更する

f:id:nonkapibara:20181125230351p:plain

3.PopEnemyObject」に「PopEnemyScript」をコンポーネント追加する

f:id:nonkapibara:20181125230600p:plain

4.EnemyPrefab」にZomBearを配置する

f:id:nonkapibara:20181125230624p:plain

5.アイコンを選択する

f:id:nonkapibara:20181125230650p:plain

6.PopEnemyObjectをプレハブ化にする

f:id:nonkapibara:20181125230711p:plain

7.ヒエラルキーウィンドウにある「PopEnemyObject」を削除する

f:id:nonkapibara:20181125230732p:plain

8.PopEnemyControllerScriptで敵をランダムに表示するスクリプトを書く

ヒエラルキーウィンドウで「EmptyObject」を作り「PopEnemys」に名前を変更する

PopEnemyControllerScript」をコンポーネント追加する。

PopIntervalを0.5に設定する(敵を表示する間隔時間)

f:id:nonkapibara:20181125230801p:plain


f:id:nonkapibara:20181125230850p:plain


f:id:nonkapibara:20181125230916p:plain

9.PopEnemyObject」をヒエラルキーウィンドウの「PopEnemys」の子オブジェクトに配置する


f:id:nonkapibara:20181125230939p:plain


f:id:nonkapibara:20181125231002p:plain

10.全部で5個作る

f:id:nonkapibara:20181125231033p:plain

11.ヒエラルキーウィンドウで「Effects」「Particle System」で「Particle System」をGunParticleに名前を変える

f:id:nonkapibara:20181125231059p:plain


12.GunParticleをプレハブ化にする。ヒエラルキーウィンドウのGunParticleを削除する

f:id:nonkapibara:20181125231122p:plain


13.プレハブ化したGunParticleを「GunBarreldEnd」にDragDropする

f:id:nonkapibara:20181125231147p:plain


14.PlayGun」を選択しShootScript

GanPoint」に「GunBarreldEnd」をDragDropする

GunParticle」に「GunParticle」をDragDropする

f:id:nonkapibara:20181125231218p:plain

15.GunParticle」を設定する

f:id:nonkapibara:20181125231251p:plain

f:id:nonkapibara:20181125231311p:plain

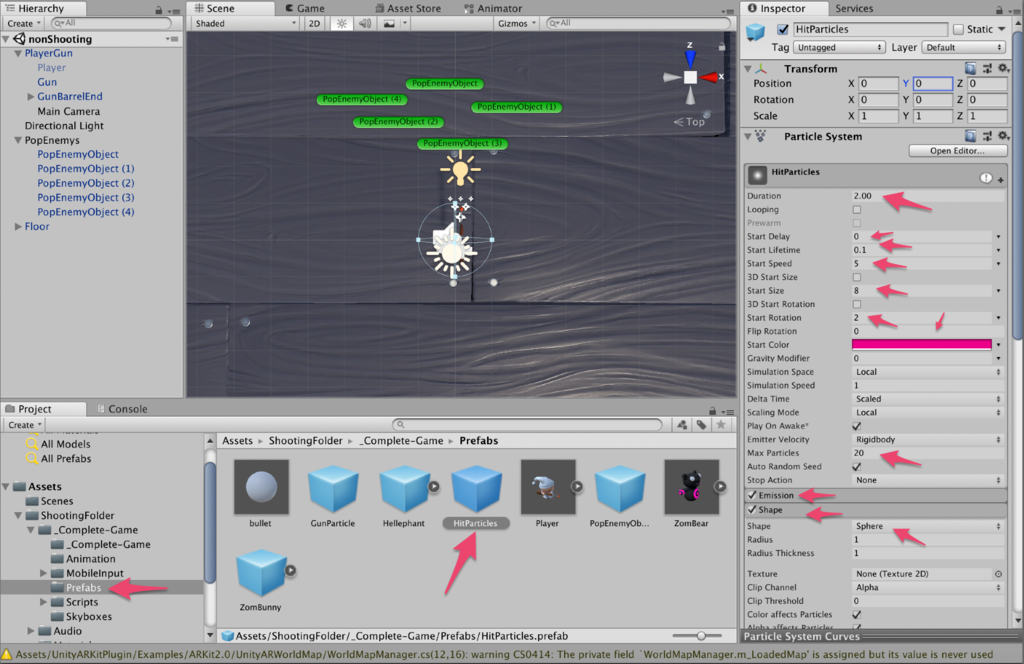
16.ヒエラルキーウィンドウで「Effects」「Particle System」で「Particle System」をHitParticlesに名前を変える

f:id:nonkapibara:20181125231329p:plain

17.ヒエラルキーウィンドウの「HitParticles」をプレハブ化する。

f:id:nonkapibara:20181125231351p:plain

18.HitParticlesにパーティクルを設定する

f:id:nonkapibara:20181125231417p:plain

19.パーティクル衝突時にDestroyする

f:id:nonkapibara:20181125231449p:plain


Particle Systemの詳細は以下のUnityマニュアルを参照しました。

Particle System メインモジュール - Unity マニュアル


■BulletScript
  using System.Collections;
using System.Collections.Generic;
using UnityEngine;
/*
 * Prefabsの「bullet」
 */
[RequireComponent(typeof(Rigidbody))]
public class BulletScript : MonoBehaviour {
#pragma warning disable 0649
    //RequireComponentは、アタッチし忘れを防ぐ。ここではRigidbodyは必須。
    // 球のスピード
    [SerializeField] float spped;
    // 
    [SerializeField] ParticleSystem hitParticlePrefab;

    void Start () {
        // 速度
        var velocity = spped * transform.forward;
        var rigid = GetComponent<Rigidbody>();
        // AddForceはrigidbodyへの継続的な力を追加
        // VelocityChangはrigidbodyに瞬時に速度変化を追加
        rigid.AddForce(velocity, ForceMode.VelocityChange);
    }

    // トリガーに入った時
    private void OnTriggerEnter(Collider other)
    {
        // ÉnemyScript.csを呼んで球が敵に当たると敵がDestroyする
        other.SendMessage("OnHitDestroyStart");
        Vector3 pos = transform.position;
        pos.y = 2.1f;
        transform.position = pos;
        // 敵と球の衝突
        Instantiate(hitParticlePrefab, transform.position, transform.rotation);
        Destroy(gameObject);
    }
    
}


■DestroyScript 
using System.Collections;
using System.Collections.Generic;
using UnityEngine;

/*
 * Prefabsの「bullet」と「HitParticles」
 */
public class DestroyScript : MonoBehaviour {
#pragma warning disable 0649
    [SerializeField] float life;
    void Start () {
        // 球のゲームオブジェクトを破棄する
        Destroy(gameObject, life);
    }
}


■EnemyScript

using System.Collections;
using System.Collections.Generic;
using UnityEngine;

/*
 * Prefabsの「ZomBear」
 */
public class EnemyScript : MonoBehaviour {
    /* 
     *BulletScript.csから呼ばれる。球が敵に当たると敵がDestroyする
     */
    void OnHitDestroyStart() 
    {
        Destroy(gameObject);
    }
}


■PopEnemyControllerScript


using System.Collections;
using System.Collections.Generic;
using UnityEngine;

public class PopEnemyControllerScript : MonoBehaviour {
#pragma warning disable 0649
    // 敵の出現間隔
    [SerializeField] float popInterval;
    // 敵の出現リスト
    PopEnemyScript[] popEnemyList;
    float timer = 0f;

    void Start () {
        // 敵の出現リストを取得する
        popEnemyList = GetComponentsInChildren<PopEnemyScript>();
    }
    
    // Update is called once per frame
    void Update () {
        // タイマーを更新する
        timer += Time.deltaTime;

        // 出現間隔
        if (timer > popInterval) 
        {
            // ランダムに敵を出現させる
            var index = Random.Range(0, popEnemyList.Length);
            popEnemyList[index].PopEnemyStart();
            // タイマーリセットする
            timer = 0;
        }
    }
}


■PopEnemyScript

using System.Collections;
using System.Collections.Generic;
using UnityEngine;

// 敵をランダムに出現させる
public class PopEnemyScript : MonoBehaviour
{
    // 敵のプレハブ
    [SerializeField] EnemyScript enemyPrefab = null;

    EnemyScript enemy = null;

    public void PopEnemyStart()
    {
        if (enemy == null)
        {
            // コピーしたいオブジェクト、
            // 敵の生成
            Vector3 pos = transform.position;
            pos.y = 0f;
            transform.position = pos;
            enemy = Instantiate(enemyPrefab, transform.position, transform.rotation);
        }

    }
}


■ShooterScript

using System.Collections;
using System.Collections.Generic;
using UnityEngine;

public class ShooterScript : MonoBehaviour {
#pragma warning disable 0649
    // 銃弾
    [SerializeField] GameObject bulletPrefab;
    // 銃口
    [SerializeField] Transform ganPoint;
    // 銃弾発射時のパーティクル
    [SerializeField] ParticleSystem gunParticle;
    
    // Update is called once per frame
    void Update () 
    {
        // Spaceキーで球を発射する
        if (Input.GetKeyDown("space"))
        {
            Createbullet();
        }
    }

    private void Createbullet()
    {
        // 銃弾を生成する
        if (bulletPrefab != null && ganPoint != null) {
            Instantiate(bulletPrefab, ganPoint.position, ganPoint.rotation);
            // 発射のパーティクル再生する
            gunParticle.Play();
        }
    }
}


【Unity】Version2 当たり判定

ショットガンで敵を倒す(当たり判定)

環境メモ

⭐️Mac OS Mojave バージョン10.14

⭐️Unity 2018.2.15f1


実際に動かした動画はこちら↓↓
https://twitter.com/nonnonkapibara/status/1066154795570946048


1.キャラクター「ZoomBear」を配置する

f:id:nonkapibara:20181124194941p:plain

2.ZoomBear」をプレハブにする

f:id:nonkapibara:20181124195013p:plain

3.プレハブ化した「ZoomBear」を追加する

f:id:nonkapibara:20181124195047p:plain

f:id:nonkapibara:20181124195110p:plain

f:id:nonkapibara:20181124195131p:plain


4.シーン上に、ZoomBearを選択し、「Capsule Collider」を追加する

f:id:nonkapibara:20181124195251p:plain

5.Rigidbodyを追加する

f:id:nonkapibara:20181124195328p:plain

6.Capsule Collider」の「Is Trigger」をチェックONする

Rigidbody」の「Is Kinematic」をチェックONする

Capsule Collider :円柱

[Capsule Collider]-[Is Trigger]・・・[OFF]:衝突せず、すり抜ける/[ON]:衝突する

[Rigidbody]-[Is Kinematic]・・・[OFF]:物理演算無効にする/[ON]:有効にする

f:id:nonkapibara:20181124195439p:plain

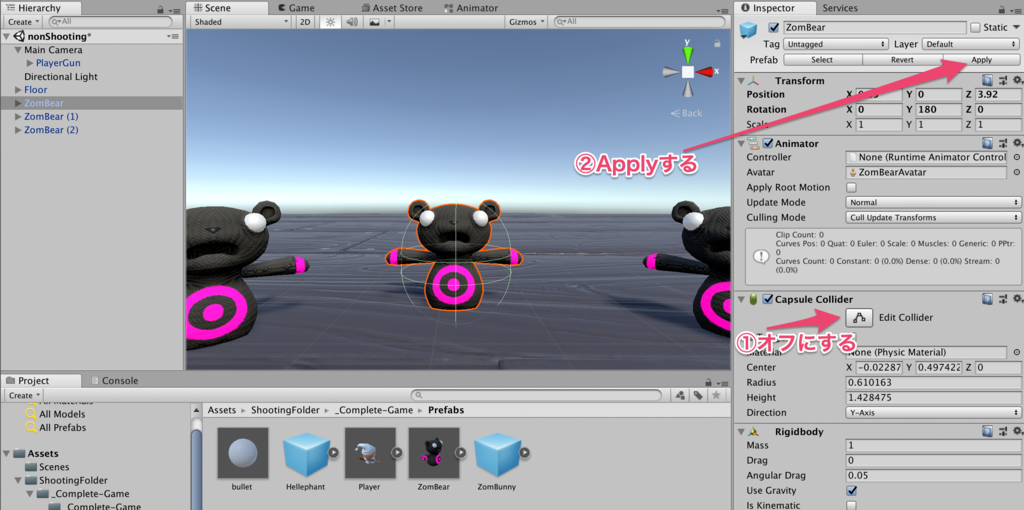
7.コライダーを編集状態にして、キャラクターを囲む

f:id:nonkapibara:20181124195516p:plain

8.プレハブにも反映させる為、Applyする。

f:id:nonkapibara:20181124195553p:plain

9.[Layers]-[Edit Layers]を選択する

f:id:nonkapibara:20181124195616p:plain

10.BulletLayer」と「EnemyLayer」レイヤーを追加する

f:id:nonkapibara:20181124195639p:plain

11.プレハブの「Bullet」のレイヤー「BulletLayer」にする

f:id:nonkapibara:20181124195702p:plain

12.プレハブの「ZoomBear」のレイヤ「EnemyLayer」にする。

Apply押す。

f:id:nonkapibara:20181124195726p:plain

13.子のオブジェクトまで変更する「Yes, change children」を選択する

f:id:nonkapibara:20181124195751p:plain

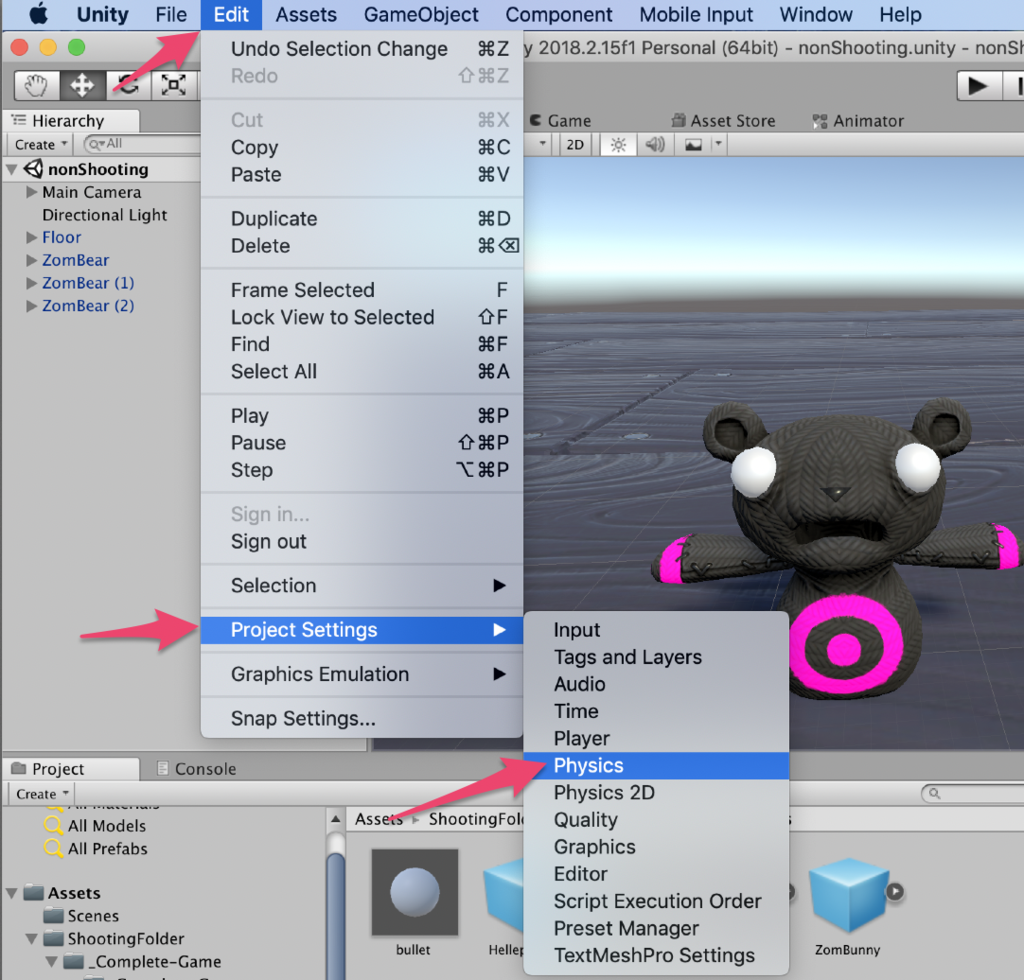
14.[Edit]-[Physics]よりPhysicsManagerを開く

f:id:nonkapibara:20181124195823p:plain

f:id:nonkapibara:20181124195846p:plain


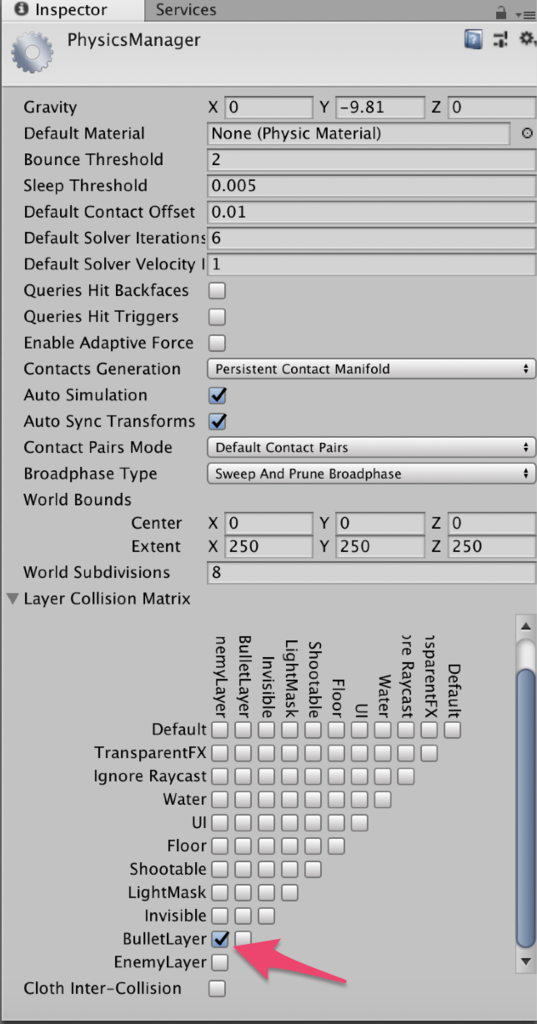
15.BulletLayer」と「EnemyLayer」間の衝突を設定する

f:id:nonkapibara:20181124195904p:plain

16.ZoomBear」に、EnemyScript.csを追加する。

Apply押す。

f:id:nonkapibara:20181124195935p:plain

17.bullet」のコンポーネント[Bulle Destroy.cs]を追加する。

Bullet Scripに衝突時、破棄する処理を書く

f:id:nonkapibara:20181124200015p:plain


■BulletScript

>|cs|
using System.Collections;
using System.Collections.Generic;
using UnityEngine;
/*
 * Prefabsの「bullet」
 */
[RequireComponent(typeof(Rigidbody))]
public class BulletScript : MonoBehaviour {
    //RequireComponentは、アタッチし忘れを防ぐ。ここではRigidbodyは必須。
    // 球のスピード
    [SerializeField] float spped = 10f;

    void Start () {
        // 速度
        var velocity = spped * transform.forward;
        var rigid = GetComponent<Rigidbody>();
        // AddForceはrigidbodyへの継続的な力を追加
        // VelocityChangはrigidbodyに瞬時に速度変化を追加
        rigid.AddForce(velocity, ForceMode.VelocityChange);
    }

    // トリガーに入った時
    private void OnTriggerEnter(Collider other)
    {
        // ÉnemyScript.csを呼んで球が敵に当たると敵がDestroyする
        other.SendMessage("OnHitDestroyStart");
        Destroy(gameObject);
    }
    
}

||<


■EnemyScript

>|cs|

using System.Collections;
using System.Collections.Generic;
using UnityEngine;

/*
 * Prefabsの「ZomBear」
 */
public class EnemyScript : MonoBehaviour {
    /* 
     *BulletScript.csから呼ばれる。球が敵に当たると敵がDestroyする
     */
    void OnHitDestroyStart() 
    {
        Destroy(gameObject);
    }
}

||<


【Unity】Version 1 ショットガンから球を発射

Version 1. ショットガンから球を発射。

Assetsストアから「Survival Shooter Tutorial」素材を使ってお勉強中!

環境メモ

⭐️Mac OS Mojave バージョン10.14

⭐️Unity 2018.2.15f1

実際に動かした動画はこちら↓↓

https://twitter.com/nonnonkapibara/status/1065776198347710464 

f:id:nonkapibara:20181123094244p:plain


1.Assetsストアから「Survival Shooter Tutorial」ダウンロードする

https://assetstore.unity.com/packages/essentials/tutorial-projects/survival-shooter-tutorial-40756

f:id:nonkapibara:20181123094537p:plain


2.Floor」をDragDropで配置する

f:id:nonkapibara:20181123094557p:plain


3.Floor」を中心に配置する

f:id:nonkapibara:20181123094629p:plain


4.Player」を「Main Camera」の直下に配置する

Player -> PlayerGunに名前を変更する。

f:id:nonkapibara:20181123094653p:plain


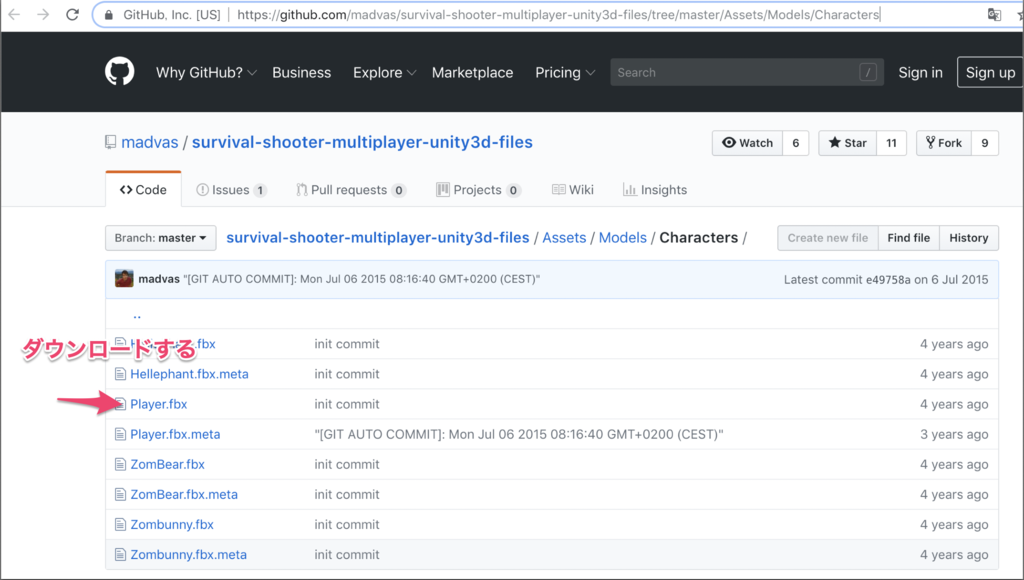
Survival Shooter TutorialPlayerのキャラクターがなかったら

https://github.com/madvas/survival-shooter-multiplayer-unity3d-files/tree/master/Assets/Models/Characters

↑Player.fbx

ダウンローする

f:id:nonkapibara:20181123094725p:plain


5.作業するために、一旦、キャラクター(Player)のみを非表示にする

f:id:nonkapibara:20181123094754p:plain

6.球を作る Sphereを選択して、名前を「Bullet」にする

f:id:nonkapibara:20181123094811p:plain

7.球をPrefabにする。Purefabにしたら、元のBulletは削除する

f:id:nonkapibara:20181123094832p:plain

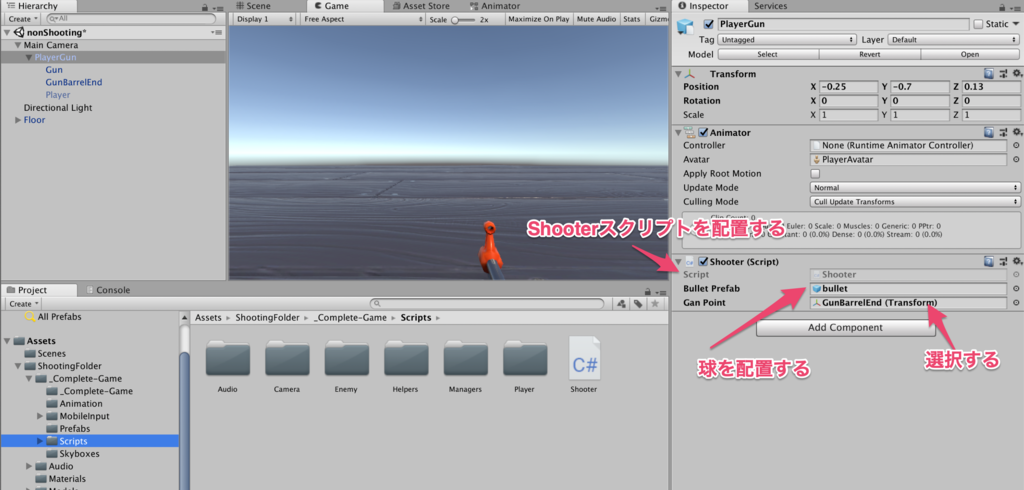
8.ShooterScript」を作成し、PlayerGunに、配置する

f:id:nonkapibara:20181123094857p:plain

9.bulletを選択しRigidbodyを追加する。

Use GravityのチェックをOFFにする。重力の影響を受けない。

f:id:nonkapibara:20181123094919p:plain

10.bulletにスクリプトを追加する

f:id:nonkapibara:20181123095148p:plain


f:id:nonkapibara:20181123100515p:plain


f:id:nonkapibara:20181123100538p:plain


11.BulletにDestroyScriptを追加する

f:id:nonkapibara:20181123130056p:plain

■ShooterScript.cs

>|cs|

using System.Collections;
using System.Collections.Generic;
using UnityEngine;

public class ShooterScript : MonoBehaviour {
    // 銃弾
    [SerializeField] GameObject bulletPrefab = null;
    // 銃口
    [SerializeField] Transform ganPoint = null;

    // Update is called once per frame
    void Update () 
    {
        if (Input.GetKeyDown("space"))
        {
            Createbullet();
        }
    }

    private void Createbullet()
    {
        // 銃弾を生成する
        if (bulletPrefab != null && ganPoint != null) {
            Instantiate(bulletPrefab, ganPoint.position, ganPoint.rotation);
        }
    }
}

||<

BulletScript.cs

>|cs|

using System.Collections;
using System.Collections.Generic;
using UnityEngine;

[RequireComponent(typeof(Rigidbody))]
public class BulletScript : MonoBehaviour {
    //RequireComponentは、アタッチし忘れを防ぐ。ここではRigidbodyは必須。
    // 球のスピード
    [SerializeField] float spped = 10f;

    void Start () {
        // 速度
        var velocity = spped * transform.forward;
        var rigid = GetComponent<Rigidbody>();
        // AddForceはrigidbodyへの継続的な力を追加
        // VelocityChangはrigidbodyに瞬時に速度変化を追加
        rigid.AddForce(velocity, ForceMode.VelocityChange);
    }
}
 

||< 


■DestroyScript.cs

>|cs|

using System.Collections;
using System.Collections.Generic;
using UnityEngine;

public class DestroyScript : MonoBehaviour {

    [SerializeField] float life = 1f;
    void Start () {
        // 球のゲームオブジェクトを破棄する
        Destroy(gameObject, life);
    }
}

 ||<